

How to Host an ARK: Survival Evolved Dedicated Server
There are hundreds of great ARK server hosts out there, but you may not even need one. If you don’t need guaranteed 24/7 uptime or super low ping, you should consider hosting one yourself. This guide will help you get an ARK server up and running from scratch. Let’s dive right in!
Hosting yourself vs Buying server hosting
Creating a dedicated ARK server is more difficult than buying hosting, but it’s also much cheaper. If you use existing hardware, the only cost to you will be electricity and internet. Alternatively, you can rent a Virtual Private Server (VPS) for a fraction of the price of ARK server rental. However, it’s worth considering the drawbacks before you jump in. Almost everything to do with the server will be up to you. That means you’ll have to maintain it, fix it, make regular backups, and take the blame when it crashes. Were’ going to cover some tips later on, but ultimately this is a higher risk. If you’re hosting on your home connection, you also have to accept that you probably won’t be able to house 250 concurrent players or even 100. It all depends on your machine’s specifications and internet connection, which we’ll get into now.
It’s worth emphasising that a VPS is often the best choice if you’re planning to get serious. Though it’s tempting to go use your own or a spare computer, hardware requirements for large servers may add up to more than hosting fees, while having less uptime and dedicated support staff. They can be surprisingly affordable while offering you the exact same degree of customization and freedom.
If this all seems a bit too much, and prefer to let someone else handle the heavy lifting, check out our guide on how to choose ark server rental.
Purchasing and Setting up a VPS
Our recommended VPS provider if your located in the US is TurnKey internet, who provides a number of different specification machines with great uptime, gigabit internet speeds, and reasonable prices. For the purpose of the guide, we’re configuring our dedicated ARK server on its most popular T120 subscription, which provides 12 CPU cores, 120GB RAID-10 storage, and 12GB RAM for $34.99 per month. Cheaper plans are available to target lower population servers.

If you need a server outside the US or in another city, we'd recommend one of A2 Hosting, Hostwinds Managed VPS or Unmanaged VPS. The process should be similar.
On TurnKey Internet's checkout page, users will see an option to choose the server location, with a choice of New York or California. You’ll also be able to choose the starting OS, which includes anything from Windows Server to CentOS 7, Ubuntu Server, Linux Mint, Ubuntu Desktop, or a custom ISO. Here, server specs can also be adjusted in a modular fashion.
After purchase, users will receive an email with details for their client area. Under products and services, you can click the relevant VPS for more detail. On the left sidebar, users will note a link to their VPS control panel, alongside a username and password. Logging in with the correct details will present users with a variety of maintenance features, from restart, shutdown, and boot, to the ability to change the OS, reconfigure networking, and view the server via a web client.
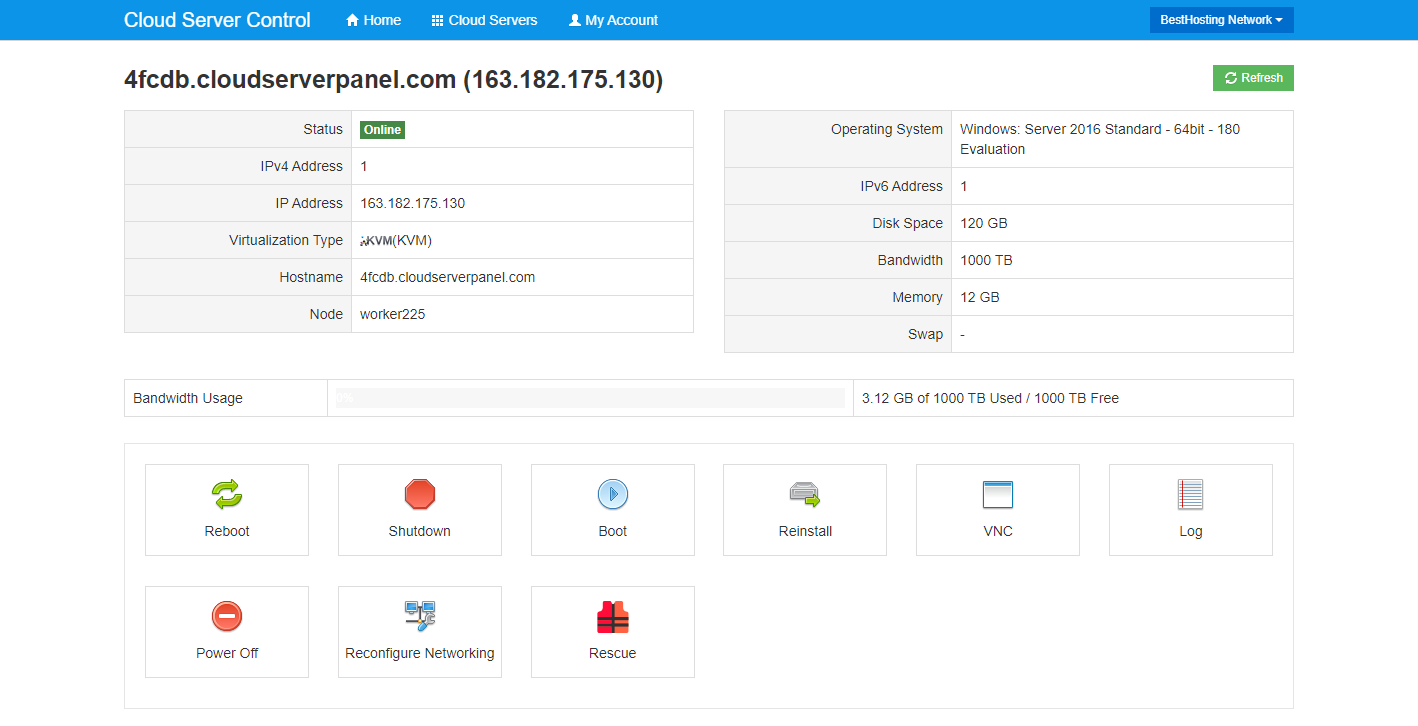
As well as through the web, you can access the server via Windows’ built-in Remote Desktop tool. Simply enter the IP address listed in the Cloud Server Control, using Administrator for a Windows host and Root for Linux. The root password can be found under the ‘Additional Information’ tab of the product in the TurnKey internet Client Area.
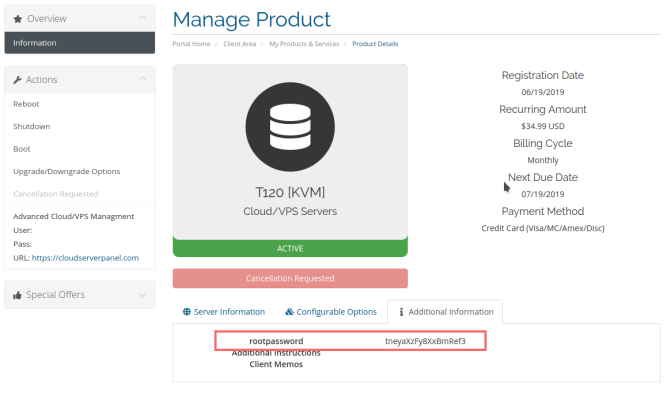
A word of warning: DO NOT share the root password with anyone. it grants full control of the server to anyone who has it.
You can now use your server as you would a normal PC.
Server Requirements
If you’re planning to set up an ARK server locally, there are a few things you need to consider. Before anything else, you need to make sure you have a 64-bit operating system (OS). Without it, you’ll be unable to run a server and could waste hours troubleshooting. Thankfully, most gamers will already have a 64-bit OS, but it’s worth checking anyway. Windows users can head to Control Panel > System and Security > System and check the System type subheading. Linux users can type the lscpu command in a terminal for similar results: “x86_32” is 32-bit, while “x86_64” means 64.
RAM is the next barrier to entry. You will need at least 6GB of RAM just to start the server. Once running, it will use another 4GB of memory for every 100 players. If you’ll be playing on the same PC as the server, you may experience frame rate drops or poor performance for your players. When renting a VPS or a dedicated server, just make sure you're buying one with enough RAM and that the installed OS is a 64-bit one.
However, if you’re hosting at home, your connection speed may be a bigger issue. There are no exact numbers on usage and the requirements vary depending on how many users are playing and what they’re doing. We recommend an upload speed of at least 10-20 Mbit if you’re going to have a lot of users, but you can get away with less if it’s just for something like 10 players or just a few friends. You can check your approximate internet speed using Netflix’s excellent speed test site fast.com.
Choosing your hosting environment
The final decision before we start is a very important one. You must decide which OS you want to use. You’ll likely be familiar with either Windows 10 or Linux, but there are advantages to moving outside of your comfort zone. Whether you’re hosting locally or via a VPS, you should be aware of the differences between the two. Linux will be a natural choice for many because it’s free, open source, and uses few system resources. If you’re setting up a local server on a spare laptop, it could be an easy choice.
However, it’s worth noting that Linux uses more base RAM when it comes to ARK servers. According to Gamepedia, the client uses 2.3GB on Windows Server 2012 R2 with no users and 3.2GB on Linux. This may offset some of the system resource advantages, but it varies depending on your choice of Linux distribution.
If you’re new to Linux, we recommend downloading Ubuntu. It has a ton of support and resources, great stability, and is relatively easy to use. More experienced users should consider Red Hat, SUSE, or CentOS, but we’ll be using Ubuntu in this guide.
If you decide to stick with Windows, you’ll still be in good hands. It’s familiar territory for many and a regular Windows 10 install should be enough to host a few players at home. If you’re planning to get serious, it’s worth looking at Windows Server 2016. It has a ton of features for server admins and comes with a 180-day free trial.
Where possible, we recommend you setup your server on a separate PC for security reasons. It’s unlikely, but opening your PC to outside connections may allow hackers to exploit security issues and they could gain access to all the data on it. If you’re using your day-to-day PC, that means all your personal information and documents. If you have an ARK server on a separate PC, only the files in it will be accessible in case of a breach. Like the saying goes it’s better to be safe than sorry.
Hosting a local ARK Server
Once you’ve made these important decisions, it’s relatively easy to get started with your ARK server, especially if you’re just hosting locally on LAN. By local, I mean the same PC you play on. LAN means it will only be available on your home network. It’s perfect if you have some friends over, your roommates are gamers, or just want to play around on your own.
Windows and Windows Server
The first step is to open Steam, right-click ARK: Survival Evolved and hit Properties. Then click Local Files > Browse Local Files.
Head to ShooterGame > Binaries > Win64. We’ll be targeting the file named ShooterGameServer.exe, but it’s not enough to just click it. It needs to know what game to load, as well as your server information and preferences.
As such, You’ll want to create a new batch file. A batch file is a plain text file that consists of a series of commands to be executed by the command-line interpreter. In our case this commands will start the server with a set of options. Right-click anywhere in Windows Explorer in the folder where ShooterGameServer.exe is, then click New > Text Document. You’ll now see a file called New Text Document.txt. Double click it to open a new notepad window and paste the following:
start ShooterGameServer.exe "MapName?SessionName=MySuperAwesomeArkServer?ServerPassword=thisisoptional?ServerAdminPassword=megasecretadminpass?Port=27015?QueryPort=27016?listen"
exit.
Do you see those question marks? Everything after the ShooterGameServer.exe part are parameters for the server and before you move on, you’ll have to customize them, so let’s break down what each parameter means.
- MapName: The name of the ARK map you want your server to be based on. For example “TheIsland”, “TheCenter”, and “Ragnarok”.
- SessionName=MySuperAwesomeArkServer: This is simply the name of your server. You can change it to whatever you like, but it’s best to avoid symbols and spaces.
- ServerPassword=thisisoptional: This is the password users need to input to access your server. If you trust everyone on the network, you can just delete this part, alongside the question mark before it.
- ServerAdminPassword=megasecretadminpass: This is the server admin password. You should probably change it something more secure.
Now, click File > Save As. You should see your Win64 directory. Change Save as type: to All Files. In the File name field, write startserver.bat and press Save.
Finally, double-click the new file and wait for it to start!
Linux
If you’re using Linux, you’ll need to change your syntax slightly. We’ll be using shell instead of batch, and that comes with some minor changes. Open your favorite text editor (I use nano for the simple things) and paste the following:
#! /bin/bash
./ShooterGameServerTheIsland?SessionName=MySuperAwesomeArkServer?ServerPassword=testpassword?ServerAdminPassword=megasecretadminpass Port=27015?QueryPort=27016?listen
Save that file to the Linux server files folder (usually something like /home/ark/server/ShooterGame/Binaries/Linux)and name it startserver.sh. If you’re wondering what’s with all those question marks, these are configuration options for the server - take a look above at the windows section for an explanation on each option. Before you try to start the server using the script, you need to make sure you can actually run it. You do that by opening the terminal in the same location of the file we just created. Now type:
$chmod +x startserver.sh
This command makes the file executable, as Linux is picky which files it lets you run for security reasons. You now start your server at any point by opening a terminal window from the folder and typing:
./startserver.sh
Installing an internet-connected server
You have a couple of choices if you want to play with users over the internet, but they’re all fairly simple. Either way, you’re going to need to download between 2 and 10 GB, so be prepared. We’re going to jump right into the most user-friendly method, which is through the Steam client.
Installing via the Steam UI
If you’re hosting locally, there’s a good chance you’ll have both ARK and Steam installed already, so this method shouldn’t be unfamiliar. However, it’s worth noting that other methods give more control over things like scheduled updates and restarts. For playing with friends, though, it should be enough.
To start, open Steam and navigate to Tools under the Library drop-down.
Scroll until you find an entry that says ARK: Survival Evolved Dedicated Server. Right-click it and press Install Game.
For me, the download was just 2GB. You can then navigate the install in: \Program Files (x86)\Steam\steamapps\common\ARK Survival Evolved Dedicated Server.
From here, the setup is very similar to how you setup a local server. Create a new text file and copy and paste the following:
start ShooterGameServer.exe "TheIsland?SessionName=ArkServer?ServerPassword=testpassword?ServerAdminPassword=adminpassword Port=27015?QueryPort=27016?listen"
exit
If you’re using Linux, you’ll need to change your syntax slightly. We’ll be using shell instead of batch, and that comes with some minor changes:
#! /bin/bash
./ShooterGameServerTheIsland?SessionName=ArkServer?ServerPassword=testpassword?ServerAdminPassword=adminpassword Port=27015?QueryPort=27016?listen
Customize the passwords, server name, and map to meet your preferences, then click File > Save As. On Windows, make sure you change Save as type: to All Files, then name it startserver.bat. Click save.
On Linux, save it as startserver.sh. There’s no need to change any options. However, you do need to make the script executable. You can do this by right-clicking, then pressing Properties. In the Permissions tab, tick Allow executing file as program.
You can then execute the script by navigating to its folder, opening a terminal window, and typing:
./startserver.sh
Windows users can just double click the .bat file to start their server, but you’ll still have to configure your firewall and router for it to work correctly.
SteamCMD
As mentioned earlier, Steam CMD is recommended for power users, but it’s also useful for those who aren’t hosting locally. If you have your server on a different PC, it means you won’t have to install the Steam client for it to work.
For Windows users, before you do anything, you should create a new folder called SteamCMD. You can then download SteamCMD.
In the same folder, create a new text file. Paste the following into it:
@echo off
start "" steamcmd.exe +login USER PASS +force_install_dir "C:\YOURSTEAMCMDFOLDER" +app_update 346110 validate +quit
Click File > Save As, change Save as type: to All files, name it SteamCMD.bat and click Save. You should now have something like this:
Right-click SteamCMD.bat and choose Run as Administrator. A command window will open and begin downloading updates.
While they’re downloading, open notepad and paste the following:
start ShooterGameServer.exe "MapName?SessionName=ArkServer?ServerPassword=testpassword?ServerAdminPassword=adminpassword?MultiHome=YourLocalIP?Port=27015?QueryPort=27016?listen"
exit
Customize the above with whatever suits your configuration, as explained in the LAN section. It’s particularly important to choose strong passwords.
Click File > Save As, change Save as type: to All files, name it startserver.bat, go to SteamCMD/ShooterGame/Binaries/Win64/ and Click Save. You can now start your server by double-clicking that file.
Linux
On Linux, the steps are very similar but require some extra tweaks and dependencies. Before you do anything, you need to install lib32gcc1.
We can do this via a very simple command in terminal: sudo apt-get install lib32gcc1
Once the install is finished, type:mkdir ~/steamcmd
cd ~/steamcmd
This creates a new directory called steamcmd, then navigates us to it using the console. We can now download,extract, and install SteamCMD by pasting:
wget https://steamcdn-a.akamaihd.net/client/installer/steamcmd_linux.tar.gz
tar -xvzf steamcmd_linux.tar.gz
./steamcmd.sh +login anonymous +force_install_dir /home/ubuntu/arkserver +app_update 376030 validate +quit
Now, before we run our server, it’s very important that we raise the open file limit on Ubuntu. When the server starts, it will try to access hundreds of files at once, and the operating isn’t currently configured for that.
In terminal, type:
sudo /bin/su -c “echo ‘fs.file-max=1000000’ >> /etc/sysctl.conf”
sudo /bin/su -c “echo ‘* soft nofile 1000000’ >> /etc/security/limits.conf”
sudo /bin/su -c “echo ‘* hard nofile 1000000’ >> /etc/security/limits.conf”
sudo /bin/su -c “echo ‘session required pam_limits.so’ >> /etc/pam.d/common-session”
This adds the text in the single quotes to the relevant config files, so you can do it via Files if it’s easier for you. To ensure all these changes take, restart your PC.
Now we’re pretty much ready to start the server, we just need to create a script to start it. Go to your server directory in /home/ubuntu/arkserver/ShooterGame/Binaries/Linux.
Open Text Editor and paste:
#! /bin/bash
ulimit -n 100000
./ShooterGameServer TheIsland?listen -server -lo
Now make the script executable by opening terminal and pasting:
cd /home/ubuntu/arkserver/ShooterGame/Binaries/Linux
chmod a+x startserver.sh
Finally, start the server with:
./startserver.sh
Firewall Configuration
To avoid issues with your server, you’ll want to configure your firewall. Without it, other users may not be able to join, as your PC will block the connection.
Thankfully, doing this in Windows is very easy. On Windows, hit Start and type Firewall. Once it’s opened, click Inbound Rules, then New Rule…
Tick Port and hit Next. Tick TCP and Specific local ports, then type 27020.
Press Next, choose Allow the connection, and press next again. A dialog will appear with the option to tick Domain, Private, and Public. Tick whichever are relevant to you and press Next. In the Name field, write "ARK Server TCP" and hit Finish.
You’ll now have to repeat the steps but instead of TCP choose UDP. Under specific local ports add 27015, 27016 and 7777. The first two are the ones we specified in the server config earlier, and 7777 is the game port. Keep the same settings as last time and name this one “ARK Server UDP”.
Now that your ports are configured, it’s time to allow access to the actual server program. Create a New Rule, choose Program, and hit Next. Click Browse... and navigate to your ShooterGameServer.exe file in:
C:\Program Files (x86)\Steam\steamapps\common\ARK\ShooterGame\Binaries\Win64
Allow the connection for both Public and Private connections, and you’re good to go. LAN users won’t have to do any extra configuration, but you should head to the Port Forwarding section if you have other plans.
Linux
On Ubuntu, opening your firewall ports is quick and easy. All we have to do is paste the following into terminal.
Sudo ufw enable
sudo ufw allow 7777/udp
sudo ufw allow 27015/udp
sudo ufw allow 27016/udp
sudo ufw allow 27020/tcp
You should now check to make sure this worked correctly. Type sudo iptables -L and check under Chain ufw-user-input for the ports.
Port Forwarding
Port Forwarding means opening up your router's inner firewall to enable connections from outside of your network. It is done by going into your router configuration page and specifying which ports you'd like to allow through. Unfortunately, there’s no easy way to walk through port forwarding. Some of the steps will be different depending on your router, and either way you’ll need admin access. Since there are thousands of types of routers, I won't show how to do it just for one kind, but you can find the steps for yours on portforward.com or just do a Google search for the term "[Router Name And Model] port forward" replacing your router name and model respectively.
First, know that this is only necessary if you’re planning to host players outside of your local network. Opening them is a slight security risk, and it’s not worth doing it unless it’s essential. If you do want to go ahead with port forwarding you'll need to open ports 27015, 27016, and 7777 for both TCP and UDP.
Configuring automatic startup
From here on, the guide will focus on making your life easier as a server host. You’re going to want your server to be online as much as possible, so it makes sense to have it start when your computer starts.
Windows
For Windows, this is easy. Open Start and type Task Scheduler. On the right-hand menu, click Create Basic Task.
Name the task ARK Server and leave a description if you’re forgetful. Click Next, then tick When the computer starts.
Now, under Action, keep Start a program selected and navigate to the startserver.bat file we created earlier. You can find it in: Program Files (x86)\Steam\steamapps\common\ARK\ShooterGame\Binaries\Win64\startserver.bat
Click Next, and be sure to tick Open the Properties dialog for this task when I click Finish. Clicking finish will take you to the General tab. Under Security options you’ll see a checkbox for Run whether user is logged on or not. While you’re there, also tick Run with the highest privileges.
Under the Configure for: drop-down, choose your OS and press OK.
Ubuntu
On Ubuntu, enabling automatic startup is very similar and a little faster. Open Startup Applications. On the right-hand side, click Add.
In the new window, put the name as Ark Server and browse to where we made the .sh file earlier. For SteamCMD users it will be in /home/ubuntu/arkserver/ShooterGame/Binaries/Linux. Click Add and you’re good to go. The server will now start on login.
Updates & Backups
Updates are incredibly easy regardless of your install method. If you followed our Windows SteamCMD tutorial, you just need run the file we made earlier called SteamCMD.bat. You can automate the process via the scripts provided by ark-survival.net, but make sure you change them to fit your install location.
Ubuntu users can just go to the steamcmd folder and paste this in terminal:
./steamcmd.sh +login anonymous +force_install_dir /home/ubuntu/arkserver +app_update 376030 validate +quit
If you installed the server via Steam, you can update the way you would any tool. You’ll be notified when there’s a new build available and can just click update. LAN users will get the most updated version packaged with their game update.
Third-party tools
It’s important to know how to do everything on your server manually so that you don’t have to rely on any third-party updates and know where to turn when things go wrong. That said, there are a few tools to help server admins install and maintain their server.
Ark Server Manager is a fantastic resource for Windows users. With it, you can automate your SteamCMD installation, track your server state, and perform scheduled backups, restarts, and server updates. The official forum has plenty of resources to get you started.
Unfortunately, it’s not available on Linux, but ARK Server Tools is a very good alternative. It’s a little more complex to use and install, but it has all the same features and is a lot easier than doing things manually.
Windows users should also take a look at Ark Commander, which lets admins easily spawn in items, perform god mode commands, and more.
BattleMetrics RCON is a paid game server management tool which supports ARK and is aimed towards more serious server hosts.
Running an ARK server on a rented server
If you decided to rent a VPS or dedicated server and want to setup an ARK server on it, this guide should get you going, as it’s just a matter of the physical location of the computer you host on, but there could be some kinks and quirks when working with a server not controlled by you, such as security requirements, hardware limitations, and bandwidth limits. I’m planning to do a special guide for hosting ARK on my favorite cloud provider Crucial Hosting, but feel free to play around with their offerings right away if you don’t want to wait.
Conclusion and maintenance tips
With that, you’re well on your way to hosting a dedicated ARK Server, be it big, small, on Linux or on Windows. However, it’s important to realize that your work doesn’t stop here. Many forgo the maintenance and backups of their server, only to greatly regret when they lose everything.
You backup your server either by using the tools mentioned above, or by copying the '/ShooterGame/Saved/SavedArks' directory when it’s shut down.
Whatever your choice, it’s important to make sure your backups are working every now and then. Don’t just check the folder, backup and then restore immediately to make sure the entire process is working.
To keep your server safe, you should also be updating your OS at every opportunity. Apply all the latest Windows or Linux security patches, as well as feature updates. It’s unlikely you’ll be targeted, but it’s a great habit to get into.
The same applies to changing your server password. You should really be editing your settings file every couple of months to make it harder for attackers and cycle out any former users that had access.
Finally, hardware can fail you just as easily as software. Make sure you run hard disk checks, keep your server cool, and monitor the resources it’s using. All of these tips will help you host a stable and lag-free ARK server, which means more fun for you and your users.
Resources & Further help
Even though this guide should get you going, sometimes things don’t go as planned, so If you find yourself stuck or needing further help, there are plenty of resources that can help you:
- ARK Gamepedia – guides, server settings, and more.
- ARK: Survival Evolved Game Walkthrough Universe – very useful scripts, customization tools, and tutorials.
- Steam Community – a point of call for any troubleshooting.
- Ark Admins subreddit – a great community for troubleshooting, questions, or just general discussion.
- Ask Ubuntu – for any Ubuntu related queries.
- Microsoft Answers – for help with Windows 10 and Windows Server
- Linode VPS Hosting Guide - A simple guide on hosting ARK on Linode using Ubuntu
Got any comments or suggestions? Encountered an issue? Have a good resource on how to host? Feel free to shoot us an email at [email protected].